Lieber Leser, im Gegensatz zu meinen anderen Papierwerke-Seiten ist diese Seite auf Englisch geschrieben, weil ich in meinen Software-Werkzeugen einfach meistens „auf englisch“ denke. Wenn Sie Interesse an dem Inhalt haben, aber mein Englisch nicht verstehen, fragen Sie bitte einfach. Meine Mailadresse finden Sie am Fuß jeder Seite.
How to Frame Your Paintings
Paintings are good objects to make your building designs look more lively. A lot of framed paintings are available from 3D Warehouse, but maybe you would like to hang some of your own favourites? Here is how I do it, and because it involves a bit of knowledge about some SketchUp tools and about components, I publish it here; maybe it is of some interest to you.
To frame a picture you need 3 things: A digital image (the painting), a frame profile (the equivalent of a cross-section through a wooden picture frame) and a frame border. The frame will be created with the Follow-Me tool by moving the frame profile along the frame border.
You can find my framing template file in the 3D Warehouse, look for "frame your paintings".
OK, to get started, get a digital image of the painting, poster or whatever you want to frame. Edit this picture until you like it and save it. It is probably unnecessary to get a high-resolution picture, something like 600 pixels along the longer side, saved as a low-to-medium-quality JPEG, will do for most cases. In any case, try to keep the file size low, not more than 100 kB at most (and 50 kB is better than 100 kB). Large image files bloat your model!
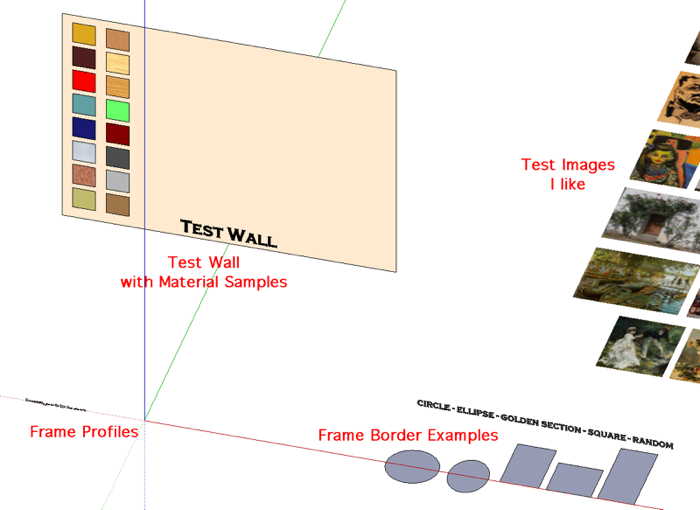
Open in my “Frame Your Pictures” SketchUp file. Import your digital painting as an image or use one of the images that come with the file. Place your imported image into the X-Y-plane, near the axes origin, to the size you like; no exact size is needed, you can re-size it later. As a reference, the largest of the frames to the right of the origin is 100 by 45 cm.
Note: "Left" and "Right" refer to a standard 3D view in which the red axis points to the right, the blue one up, and the green one into the back of the screen. The model contains some frame line suggestions, some frame profiles, sample materials, a test wall and maybe some example images to play with.
 I will explain the technique for using images as textures because this method works universally. Other techniques (without exploding the image) only work for rectangular images. Once you understood the method there may be easier ways to do it and you can invent your own shortcuts.
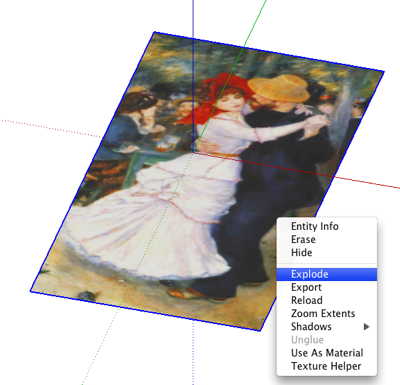
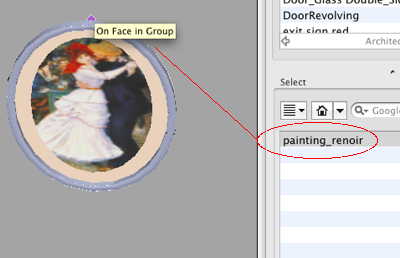
Explode your image object. You get a rectangular face with the image as a texture. Look into the “Materials” window, you will see the image as a new texture in the “In Model” list.
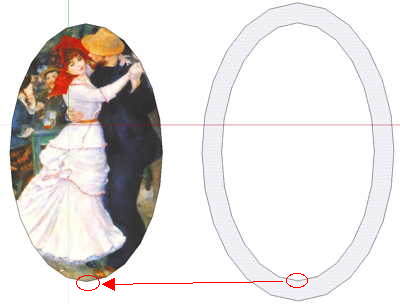
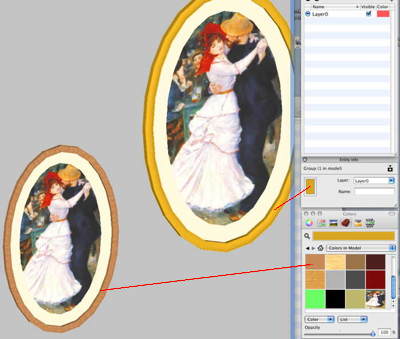
 If you want to change the shape of your picture (to an oval, for example), delete your complete exploded picture (the texture will still be available). Now draw the shape you want to use (or use one of the pre-made shapes in the file). Then apply the new texture to the face you created.
Note: If the image comes as a mirror image, use "Reverse Faces" on the shape you created, and then apply the texture again. What has happened is that you painted the back of the shape.
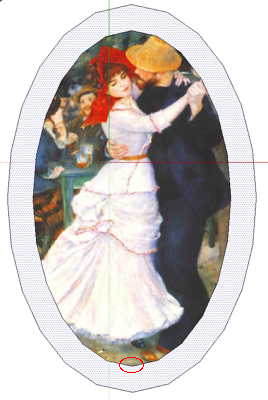
Use the “Position Texture” function (right-click,Texture -> Position) to correct the position: Drag the red pin to set the lower left corner, drag the green pin to size the image. Repeat until you are satisfied. (Do not just click the pins, this would re-position them, and they are in perfect positions by default.)
 If you want to add a mat (passe-partout) to the picture you need to copy-move your picture, then select the picture face, and draw a surrounding line with the Offset tool. You will notice that the Offset tool destroys the image texture, this is why we copied it. Delete the inner face and paint the mat with a colour you like.
 Now move the mat back into its correct position (use points on the inside of the mat/outside of the image that you can easily identify as matching on the mat and image shapes).
The image and mat are done, now for he frame. Look at the frame profiles (lower left side). Choose a frame profile you like, or draw your own.
The pre-drawn profiles are built to a common standard: They are in the X-Y- (red-green-) plane. On the right side, exactly on the red (X-) axis, you will see one point with an oblique angle. This is the point that will run along the frame border; I call it the "insertion point". The oblique "cut" away from this point makes sure that the image and the frame will touch only along one line, not a face (a common face might cause shimmering, technically known as "z-fighting").
 Do not use elaborate profiles if it is not absolutely necessary, the details will bloat your file size and will probably be lost to the observer anyway once you hung the picture. Avoid frame profiles with arcs, they create bigger files and the arc endpoints will draw additional lines around your frame when Follow-Me is applied. I still provided some frame profiles with arcs as examples because they look good and you can experiment with them.
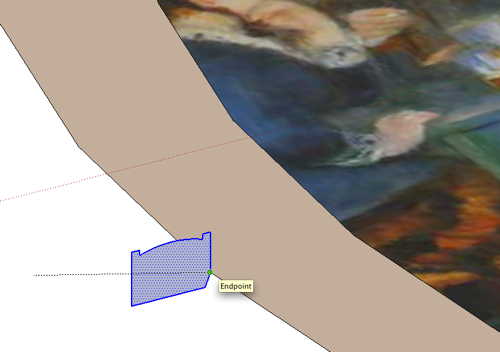
Copy-move the frame profile you choose so that its insertion point (the point on the right side that is on the red axis) touches a point on the left side of the image border. Choose a point where the profile is more or less perpendicular to the image (or mat) border, but exactly right angles are not necessary, SketchUp sees to that.
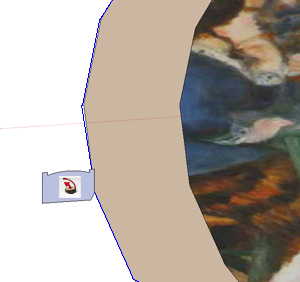 Select the complete outer image (or mat) border. Use the Follow-Me tool and click the frame profile. SketchUp will draw the frame.
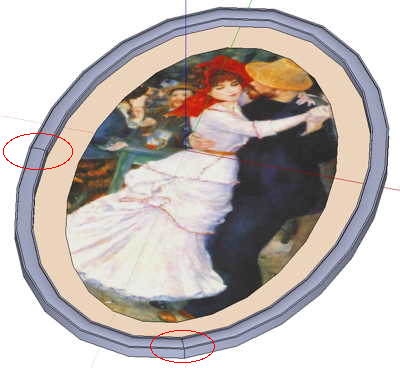 Note that there may be additional lines across the frame. This happens when the frame border line was broken, which may be a result of the Offset function. Select the additional lines and hide them (if you do not choose to hide all frame line, see below).
You may paint the frame now if you like. However, you can also leave the frame unpainted (i.e. in default colour), then you can easily paint it later once the picture has been hung. This makes it possible to hang the same framed image with different frame colours later on.
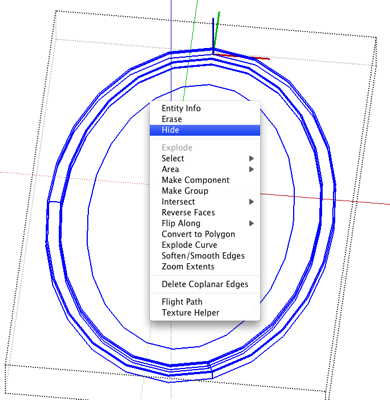 To make all or some frame contours invisible it is best to switch to wireframe view. Select and hide (or shift-Erase) the lines you do not want to see in the finished frame. Note that the fewer visible lines you have in a SketchUp model the faster is the rendering of SketchUp views.
 Create a component from image, mat and frame. Set the component to glue to vertical faces. Set the component axes to the middle point of the top of the frame so that the red-green plane of the component is aligned with the underside of the frame, i.e. with the face that should glue with the wall when hung.
 Test-hang your picture: Drag it from the component window into your model, onto the "Test Wall" provided in the model. Everything OK? Does it align with the wall? Is the insertion point (top of frame) correct?
 If the picture frame was unpainted you can also paint it now; this does not affect the component itself but only the only picture you just hung.
If everything is as it should, save your framed picture into an .SKP file (right-click the component and "Save As..."). You are done!
Well, a bit of housekeeping may be in order. If you want to save the “Frame Your Pictures” SketchUp file when you are done, you may want to delete the instance of your new painting component from the model and to remove unused components and materials.
Well, here is the shortcut for rectangular pictures: Place the image (do not explode it), create a rectangle on it (same size, draw it corner to corner), apply Offset if you want a mat. Remove the face of the rectangle, leaving just the line (and the mat, if created). Place a profile, as described above, on one corner of the line (outer line of the map, if any). Select the line and apply Follow Me to the profile. The rest works as described above.
Note that the image is not added to the textures with this method.